Speeding up the Android Virtual Device part 2: using Intel HAXM!
Hi everyone.
This mini series talks about two tools to improve the speed of the Android Virtual Devices (AVD). The first one is the now well-known Genymotion, and the second is the Intel HAXM.
You can find the first article here:
- Part 1: Genymotion: the previous article.
- Part 2: Intel HAXM: this article.
NOTE: In this tutorial, we’ll use the official Android ADT Studio that you can find here. (I really like this bundle, it contains obviously the Android SDK, but also Eclipse, and several useful plugins for instance Git. No installation is required, all is ready to rumble from the pack. So just get it!)

Once it’s unzipped and ready to be launched, we are ready to install the Intel’s HAXM.
The Intel’s HAXM
The Hardware Accelerated eXecution Manager from Intel uses a similar approach to the Genymotion’s one, but using Intel technologies and permits two things:
-
First, it uses the
Intel Virtualization Technology(or VT) in the same way Genymotion uses VirtualBox. Most Intel CPUs provide extensions for running virtual machines more efficiently (so you need an Intel CPU supporting the VT, obviously). -
Second, it works on an x86 image system, so one can test Android applications on x86 using this technology.
Downloading and installing it.
Launch the Android SDK, from Eclipse it can be found by clicking on this icon.
 The Android SDK Manager Icon
In order to be able to use the Intel HAXM, one will need two things:
- The HAXM: in Extra > Intel x86 Emulator Accelerator.
- The most recent x86 image, here: Android 4.4 (API 19) > Intel x86 Atom System Image.
Select these two packages and click on “Install 2 packages” and let the magic install itself (be sure to have the SDK in the path).
- When all is installed, quit Eclipse and execute:
<sdk>/extras/intel/Hardware_Accelerated_Execution_Manager/IntelHAXM.exe- You can see the SDK path on the top of the Android SDK Manager window.
- Follow the instructions and complete the installation.
-
After installation completes, open a command window and run the following command (on a Windows machine):
sc query intelhaxm -
You should see a message indicating the state “running”.
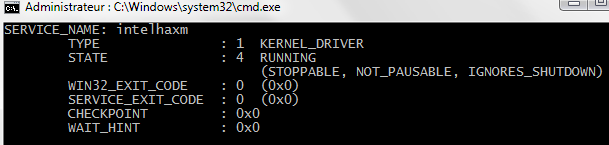 Running OK
Running a new Virtual Device.
The Intel HAXM is now functional, go to the Android Virtual Device Manager in Eclipse and create a new x86 device based on the previously installed Intel x86 Atom System Image.
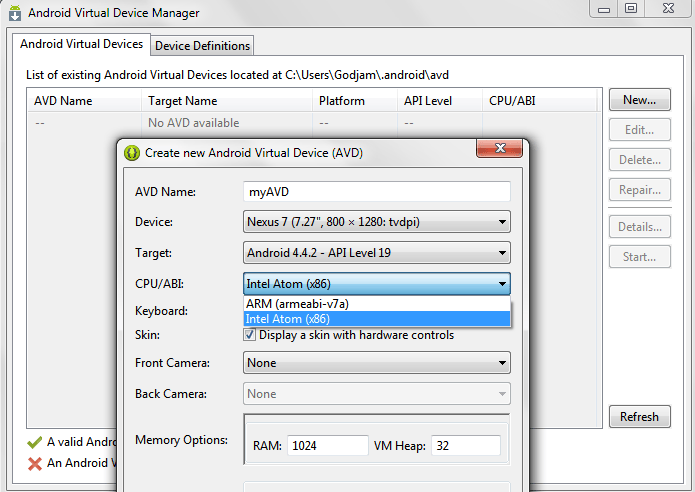 x86 virtual device creation
- Now launch it.
- Run your debug project on it. This is pretty fast.
To finish on HAXM, you can find more on it on the official page and on the Android Developer page.
Conclusion
To conclude on this series, which virtualization method should you choose?
-
If you plan to work on x86 architecture, use
Intel HAXM. -
Else you can choose the one you want. Whatever the OS you use, these two solutions can work either on Windows, MacOS, or Linux.
-
Note that if you plan to work with OpenGL, you can access the GPU in the same way with the
Intel HAXMsolution if you have a compatible GPU processor.
That’s all for the series, expecting you enjoyed it, feel free to reach me to give your opinion on it.
Thanks, and see you next time.