1. Dynamic textures drawing for Three.js!
This article is about texture drawing, it is a part of a series, composed of:
- Part 0: Introduction
- Part 1: Dynamic texture drawing ⬅️ You are here.
- Part 2: 3D physics for the mobile web
- Part 3: Gluing all together with ECS (Entity-Component-System)
Why do we need dynamic texture drawing?
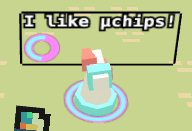
Dynamic textures drawing is convenient for having dynamic textures, like animations, procedurals animations on textures, or altering textures due to environment. In our case, we try to mix 2D and 3D, and the use dynamic textures permit us to an animation on sprites. For instance, see the above example with the player texture.
 Here is an example with a 2D texture for the player
I’ve written a little tool that can take any canvas and use it as a texture. So we can take any 2D canvas render (for instance a small game) and render it in the 3D world. In games like Half-life 2 this have been use to have in-game cameras.
But we’ve also extended it to render 2D GUIs in-game, for instance:
 Here is another example with a GUI demonstrating a ground circular loader for the tower (it loads when you’re nearby. Once loaded, the tower’s GUI shows up) and the tower’s GUI, featuring some layout, text and another circular loader showing a tower’s component internal value.
How to do it with Three.js?
The process is quite simple:
- We create an in-memory canvas (or any canvas) and write on it.
- We set the canvas as the content of a texture.
- We apply the texture on a mesh. To write on the ground or on ‘virtual’ screens we use horizontal or vertical plans.
First, let’s look at the in-memory canvas creation. You can see an example with getTile(x, y, options = {}) in spritesheet.js)
createCanvas(width, height, /* other options */) {
    // create a canvas and its context
    const ctx = document.createElement('canvas').getContext('2d');
    ctx.canvas.width = width;
    ctx.canvas.height = height;
    // scale ctx
    ctx.save();
    ctx.translate(0, 0);

    // draw with the canvas api, eg:
    ctx.fillText(text, x, y);
    // can be ctx.drawImage, etc

    // finally restore ctx
    ctx.restore();
    // return the context canvas
    return ctx.canvas;
}
Then, this canvas can then be used as a texture, as shown in createTexture(x, y, options = {})in entityfactory.js
createTexture(/* ... */) {
    // create our canvas
    const tile = createCanvas(16, 16);

    // set it in a texture
    const texture = new Texture(tile);

    /* ... any texture operations (flip, repeat, etc) */
    // here we let the texture be compatible with pixel-art
    texture.minFilter = LinearMipmapLinearFilter;
    texture.magFilter = NearestFilter;
    texture.needsUpdate = true;
    return texture;
}
Finally, we can now apply our texture on a mesh. An example for this can be seen in createCrate in entityfactory.js
createCrate(position = new Vector3(), size = new Vector3(1, 1, 1)) {
        const geometry = new BoxGeometry(size.x, size.y, size.z);

        // We use a first texture on a first material
        // we can do this for each needed material
        const material0 = new MeshBasicMaterial({
            map: this.createTexture(1, 11)
        })

        // We can add different material for each face:
        // left, right, top, bottom, back, front
        const materials = [];
        materials.push(material1); // left
        // ...

        // We add the materials to the mesh
        const mesh = new Mesh(geometry, materials);
        mesh.position.copy(position);

        // ... Cannon setup for the block (we'll see that later)
        // ... Ecsy setup for the block (we'll see that later)
    }
In each snippet, I’ve included comments to guide you through the process. As you can see it’s quite straitforward, the tricky part is really the canvas part. If you want to modify a texture, for instance with bullets impacts, dust, or other effects, you have to write the texture first on a canvas then alter it using the canvas API.
Next times, we’ll dive into how we set up the physics with Cannon.js and the entity logic with Ecsy for these elements.
So see you in the next article to see how to integrate our 3D physics engine into the game!